Posts

Salesforce and Teams Integration

Image
          The Document from Salesforce and Microsoft is sufficient to do the Integration  Apart from the documentation from the salesforce and Ms. Teams. Coming to the Integration, It is done at both the ends that is Salesforce configuration and Ms. Teams Configuration Salesforce Configuration Step 1: Setup -- Quick Search --- Team Integration. Step 2: If you load the page you see the following message saying " Contact Your Account Executive ". Step 3: If you see the above message that is normal you can still                  Integrate Ms teams and Salesforce. Step 4: Raise a Case to Salesforce from the salesforce team you will                  receive a $0 Agreement so you can sign. Step 5: Once the Agreement is signed from your side they will open                the portal which will look like this. The rest of the configuration is the same as the documentation           that is provided by the salesforce and Microsoft Note: Once you Enable a Teams Integration, the "

Adding Attachmnet to Calendar Event (Microsoft Graph API)

Image
            From the given documentation we cannot Attach a document while creating an event Follow the steps to add an Attachment in a Calender event through MS Flows: Step 1:Refer the Create event documentation graph API Step 2: From the create event get the event id, to use in the attachment API Sept 3: As per the document give all the required details from the URL and body of the flow Step 4: After processing the Attachment API, Update the event . Step 5: Once updated your will reacive a mail with attachment.

Adding Members in Yammer community using MS flows

Image
Here we will know how to add members to a yammer group using ms flows. Please following the following steps: Step 1:  We need to register the yammer application .               Follow the steps from the link and get the Bearer token from it.                  Generate the Token from it.                     Step 2: Create a blank ms flow with a button trigger. Step3: Initialize a String and add the following content into the string variable.         "  https://www.yammer.com/api/v1/group_memberships.json?group_id={Yammer group id}&email={O365 Email id}" Note: Yammer group id will be in form of integer eg; 6*********6 Step 4: Add an HTTP Action next to it and do the following. Step 5: Now trigger the flow you will get members added into the yammer community. 

Create a Yammer Group though MS flows

Image
 To Create a Yammer Group using MS flows. Proceed with the following steps: Step1: Register a Yammer Group  follow the registration process. Step2: After Registration, Generate the bearer Token id,   Integration                                                                                                                                                                                                                             Step 3: Create an MS with a button Trigger. Step 4: Initialise a string Variable. with the following a string content                 " https://www.yammer.com/api/v1/groups.json?name={Group Name}&private=true&show_in_directory=true" Step 5: Add an HTTP Request Action to create a yammer group. refer the following pic     Add the headers as well  NOTE: The User should the network admin of yammer Step 6: Execute the flow you will get the yammer group created through MS flow.

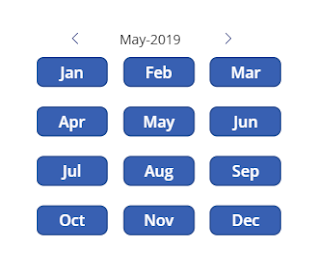
Month Picker in Power Apps

Image
For the enabling month picker in PowerApps. There is no direct option in Powerapps. We need to do a workaround procedure for a month picker. This month Picker is a custom build. With the help of SharePoint List, we can get the month picker working, Proceed with the following steps   Step 1: Create a Sharepoint list with the columns month in Letters and in numerics. Refer to the following pic: Create a new list in a SharePoint  with column title and number  with single line text data type Step 2:Inside a power app Create a gallery with the data source as the month picker SharePoint List Step3: Wrap the gallery with 3 columns and adjust the rows as per the requirement NOTE: Create a gallery with a Vertical view and with a wrap count of 3. Adjust the gallery as per your requirement  Add the List that you created the month picker in the data source of the gallery. Inside the ITEMS dialog box use the following formula. SortByColumns(Month_Picker,"ID",Ascending)                  To